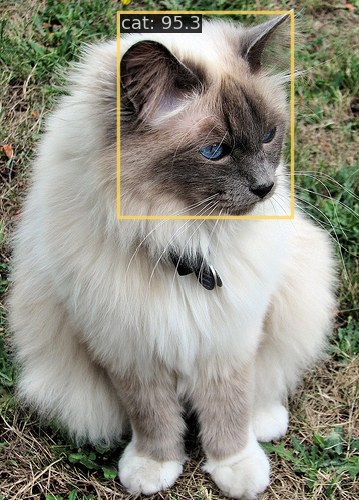
前言
MMDetection是一个目标检测工具箱,包含了丰富的目标检测、实例分割、全景分割算法以及相关的组件和模块,github项目地址。- 支持的目标检测(
Object Detection)模型(近年来的一些SOTA模型):DAB-DETR、RTMDet、GLIP、Detic、DINO - 支持的实例分割(
Instance Segmentation)模型(近年来的一些SOTA模型):Mask2former、BoxInst、SparseInst、RTMDet - 支持的全景分割(
Panoptic Segmentation)模型:Panoptic FPN、MaskFormer、Mask2Former - 关于实例分割和全景分割的区别:全景分割同时提供了像素级别的语义类别和实例标识符,而实例分割只关注物体实例的边界和分割。全景分割提供了更全面的信息,适用于需要对每个像素进行细粒度分析的任务,如自动驾驶。实例分割更专注于检测和分割物体实例,适用于目标检测和图像分割等任务。
- 本文主要介绍了
MMDetection的训练与测试过程,在数据集Dog and Cat Detection上微调了RTMDet模型,解析了RTMDet模型,最终模型指标bbox_mAP达到了0.952。
环境配置
- 完整的环境配置代码如下,如果不想看分步解析可以直接跳过本节剩余的内容:
import IPython.display as display!pip install openmim
!mim install mmengine==0.7.2
# 构建wheel,需要30分钟,构建好以后将whl文件放入单独的文件夹
# !git clone https://github.com/open-mmlab/mmcv.git
# !cd mmcv && CUDA_HOME=/usr/local/cuda-11.8 MMCV_WITH_OPS=1 pip wheel --wheel-dir=/kaggle/working .
!pip install -q /kaggle/input/frozen-packages-mmdetection/mmcv-2.0.1-cp310-cp310-linux_x86_64.whl!rm -rf mmdetection
!git clone https://github.com/open-mmlab/mmdetection.git
!git clone https://github.com/open-mmlab/mmyolo.git
%cd mmdetection%pip install -e .!pip install wandb
display.clear_output()
- 首先安装
open-mmlab的包管理库openmim,然后安装mmengine库,代码如下:
!pip install openmim
!mim install mmengine==0.7.2
- 由于在
kaggle中无法通过mim直接安装mmcv(后续训练会报错),我们只能通过构建wheel的方式安装,代码如下:
!git clone https://github.com/open-mmlab/mmcv.git
!cd mmcv && CUDA_HOME=/usr/local/cuda-11.8 MMCV_WITH_OPS=1 pip wheel --wheel-dir=/kaggle/working .
- 上面一步需要等待大概30分钟的时间,然后你就会在
/kaggle/working目录下发现mmcv-2.0.1-cp310-cp310-linux_x86_64.whl文件,使用pip install -q /kaggle/working/mmcv-2.0.1-cp310-cp310-linux_x86_64.whl安装即可。但为了节省时间,防止每次运行都需要等很长时间,我将构建的wheel下载然后上传到kaggle Datasets这样每次只用加载数据集就可以安装了,这里提供数据地址。所以安装代码变为:
!pip install -q /kaggle/input/frozen-packages-mmdetection/mmcv-2.0.1-cp310-cp310-linux_x86_64.whl
- 通过
git clone的方式安装mmdetection,因为数据集为.xml后缀,后面我们需要使用mmyolo中的工具转换格式,所以一起下载,但不安装mmyolo。
!rm -rf mmdetection
!git clone https://github.com/open-mmlab/mmdetection.git
!git clone https://github.com/open-mmlab/mmyolo.git# 进入mmdetection项目文件夹
%cd mmdetection# 安装mmdetection
%pip install -e .
- 如果安装过程中出现pycocotools安装问题,可以参考我的上一篇文章MMYOLO框架标注、训练、测试全流程(补充篇),里面有详细的解决方案。
- 因为在训练过程中需要可视化各项指标,所以安装
wandb包,并登录。
!pip install wandbimport wandb
wandb.login()
模型推理
- 我们首先创建一个文件夹
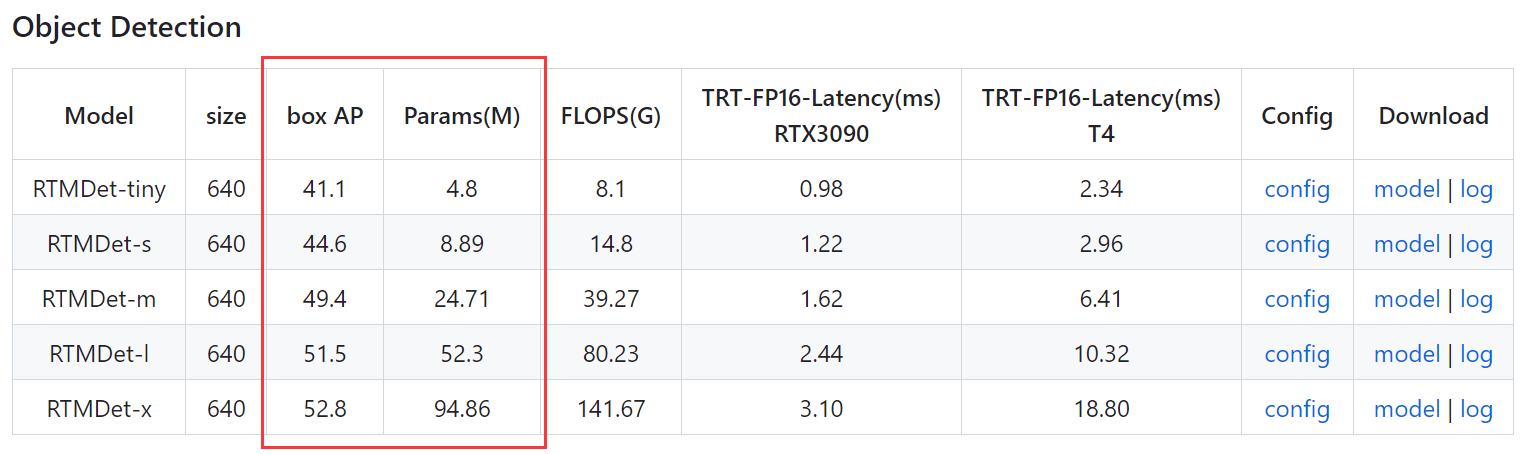
checkpoints,用于存放模型的预训练权重。因为我们选择的是RTMDet模型,所以下载对应权重。 - 我们可以打开
mmdetection的github项目地址,进入configs/rtmdet路径,在README.md文件中有详细的预训练权重。
- 可以看到,模型参数量(
Params)越多,精度指标(box AP)越高,我们选择一个参数量适中的模型RTMDet-l,对应的configs文件名为rtmdet_l_8xb32-300e_coco.py。意思是RTMDet-l型号,在8个GPU上,每个GPUbatch size为32,在coco数据集上训练了300epochs的权重。下载并保存在checkpoints文件夹下
!mkdir ./checkpoints
!mim download mmdet --config rtmdet_l_8xb32-300e_coco --dest ./checkpoints
- 使用模型进行推理,并可视化推理结果
from mmdet.apis import DetInferencermodel_name = 'rtmdet_l_8xb32-300e_coco'
checkpoint = './checkpoints/rtmdet_l_8xb32-300e_coco_20220719_112030-5a0be7c4.pth'device = 'cuda:0'inferencer = DetInferencer(model_name, checkpoint, device)img = './demo/demo.jpg'result = inferencer(img, out_dir='./output')
display.clear_output()from PIL import Image
Image.open('./output/vis/demo.jpg')
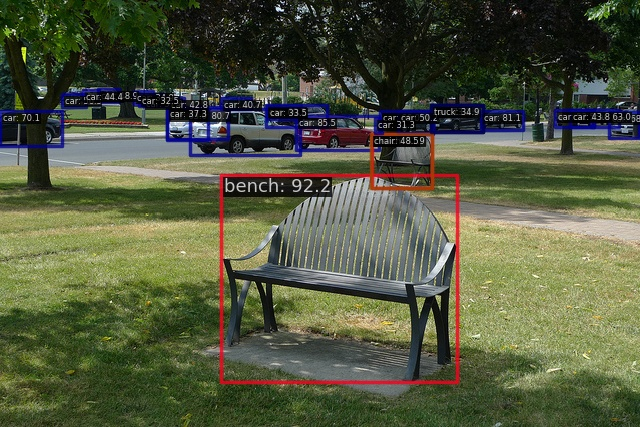
- 如果到这里都没有出现任何问题,说明环境配置的非常成功,RTMDet模型做出了推理。
数据整理
- 数据集
Dog and Cat Detection文件组织信息:
- Dog-and-Cat-Detection- annotations- Cats_Test0.xml- Cats_Test1.xml- Cats_Test2.xml- ...- images- Cats_Test0.png- Cats_Test1.png- Cats_Test2.png- ...
- 由于
kaggle中在input路径下的数据集是只读类型,不允许更改,并且标注文件为.xml格式,需要转换,这里先将图片复制到./data/images目录下
import shutil# 复制文件到工作目录
shutil.copytree('/kaggle/input/dog-and-cat-detection/images', './data/images')
- 由于后续切分数据集需要标注信息为
.json格式,我们将dog-and-cat-detection/annotations文件夹中的.xml文件转换为1个.json文件。
import xml.etree.ElementTree as ET
import os
import jsoncoco = dict()
coco['images'] = []
coco['type'] = 'instances'
coco['annotations'] = []
coco['categories'] = []category_set = dict()
image_set = set()category_item_id = -1
image_id = 0
annotation_id = 0def addCatItem(name):global category_item_idcategory_item = dict()category_item['supercategory'] = 'none'category_item_id += 1category_item['id'] = category_item_idcategory_item['name'] = namecoco['categories'].append(category_item)category_set[name] = category_item_idreturn category_item_iddef addImgItem(file_name, size):global image_idif file_name is None:raise Exception('Could not find filename tag in xml file.')if size['width'] is None:raise Exception('Could not find width tag in xml file.')if size['height'] is None:raise Exception('Could not find height tag in xml file.')image_id += 1image_item = dict()image_item['id'] = image_idimage_item['file_name'] = file_name + ".png"image_item['width'] = size['width']image_item['height'] = size['height']coco['images'].append(image_item)image_set.add(file_name)return image_iddef addAnnoItem(object_name, image_id, category_id, bbox):global annotation_idannotation_item = dict()annotation_item['segmentation'] = []seg = []seg.append(bbox[0])seg.append(bbox[1])seg.append(bbox[0])seg.append(bbox[1] + bbox[3])seg.append(bbox[0] + bbox[2])seg.append(bbox[1] + bbox[3])seg.append(bbox[0] + bbox[2])seg.append(bbox[1])annotation_item['segmentation'].append(seg)annotation_item['area'] = bbox[2] * bbox[3]annotation_item['iscrowd'] = 0annotation_item['ignore'] = 0annotation_item['image_id'] = image_idannotation_item['bbox'] = bboxannotation_item['category_id'] = category_idannotation_id += 1annotation_item['id'] = annotation_idcoco['annotations'].append(annotation_item)def parseXmlFiles(xml_path):for f in os.listdir(xml_path):if not f.endswith('.xml'):continuexmlname = f.split('.xml')[0]bndbox = dict()size = dict()current_image_id = Nonecurrent_category_id = Nonefile_name = Nonesize['width'] = Nonesize['height'] = Nonesize['depth'] = Nonexml_file = os.path.join(xml_path, f)tree = ET.parse(xml_file)root = tree.getroot()if root.tag != 'annotation':raise Exception('pascal voc xml root element should be annotation, rather than {}'.format(root.tag))for elem in root:current_parent = elem.tagcurrent_sub = Noneobject_name = Noneif elem.tag == 'folder':continueif elem.tag == 'filename':file_name = xmlnameif file_name in category_set:raise Exception('file_name duplicated')elif current_image_id is None and file_name is not None and size['width'] is not None:if file_name not in image_set:current_image_id = addImgItem(file_name, size)else:raise Exception('duplicated image: {}'.format(file_name))for subelem in elem:bndbox['xmin'] = Nonebndbox['xmax'] = Nonebndbox['ymin'] = Nonebndbox['ymax'] = Nonecurrent_sub = subelem.tagif current_parent == 'object' and subelem.tag == 'name':object_name = subelem.textif object_name not in category_set:current_category_id = addCatItem(object_name)else:current_category_id = category_set[object_name]elif current_parent == 'size':if size[subelem.tag] is not None:raise Exception('xml structure broken at size tag.')size[subelem.tag] = int(subelem.text)for option in subelem:if current_sub == 'bndbox':if bndbox[option.tag] is not None:raise Exception('xml structure corrupted at bndbox tag.')bndbox[option.tag] = int(float(option.text))if bndbox['xmin'] is not None:if object_name is None:raise Exception('xml structure broken at bndbox tag')if current_image_id is None:raise Exception('xml structure broken at bndbox tag')if current_category_id is None:raise Exception('xml structure broken at bndbox tag')bbox = []bbox.append(bndbox['xmin'])bbox.append(bndbox['ymin'])bbox.append(bndbox['xmax'] - bndbox['xmin'])bbox.append(bndbox['ymax'] - bndbox['ymin'])addAnnoItem(object_name, current_image_id, current_category_id, bbox)os.makedirs('./data/annotations')
xml_path = '/kaggle/input/dog-and-cat-detection/annotations'
json_file = './data/annotations/annotations_all.json'
parseXmlFiles(xml_path)
json.dump(coco, open(json_file, 'w'))
- 当前工作目录数据存储文件组织信息:
- mmdetection- data- annotations- annotations_all.json- images- Cats_Test0.png- Cats_Test1.png- Cats_Test2.png- ....- ...
- 由于我们需要使用
mmyolo项目文件中的一个脚本,将数据分为训练和测试集,先进入mmyolo项目文件夹
# 切换到mmyolo项目文件夹
%cd /kaggle/working/mmyolo
- 切分脚本文件位于
tools/misc/coco_split.py,参数由上到下分别为: --json(生成的.json文件路径);–out-dir(生成的切分.json文件存储文件夹路径);–ratios 0.8 0.2(训练集、测试集占比);–shuffle(是否打乱顺序);–seed(随机数种子)
# 切分训练、测试集
!python tools/misc/coco_split.py --json /kaggle/working/mmdetection/data/annotations/annotations_all.json \--out-dir /kaggle/working/mmdetection/data/annotations \--ratios 0.8 0.2 \--shuffle \--seed 2023
- 输出:
Split info: ======
Train ratio = 0.8, number = 2949
Val ratio = 0, number = 0
Test ratio = 0.2, number = 737
Set the global seed: 2023
shuffle dataset.
Saving json to /kaggle/working/mmdetection/data/annotations/trainval.json
Saving json to /kaggle/working/mmdetection/data/annotations/test.json
All done!
- 接着切换回
mmdetection项目文件夹:
%cd /kaggle/working/mmdetection
- 此时工作目录数据存储文件组织信息:
- mmdetection- data- annotations- test.json- trainval.json- annotations_all.json- images- Cats_Test0.png- Cats_Test1.png- Cats_Test2.png- ....- ...
编辑RTMDet模型配置
-
RTMDet模型架构图可以在对应参数文件夹README.md文档中找到。

-
可以在
github中打开configs/rtmdet/rtmdet_l_8xb32-300e_coco.py配置文件(观察_base_值,若有继承关系,可以一直往上查找,直到找到主文件),这里RTMDet-l型号模型已经是主文件了,可以直接查看。 -
我们要更改的主要就是
_base_(继承的上级文件)、data_root(数据存储的文件夹)、train_batch_size_per_gpu(每个GPU训练的batch size)、train_num_workers(核心工作数,一般为n GPU x 4)、max_epochs(最大epoch数)、base_lr(基础学习率)、metainfo(种类信息及各种类对应调色板)、train_dataloader(图片路径及训练集标注信息)、val_dataloader(图片路径及验证集标注信息)、val_evaluator(验证集标注信息)、model(冻结骨干网络stages数,种类数)、param_scheduler(学习率衰减趋势)、optim_wrapper(学习率赋值)、default_hooks(模型权重保存策略)、custom_hooks(数据管道切换)、load_from(预训练权重加载路径)、train_cfg(赋值max_epochs以及验证测量)、randomness(固定随机数种子)、visualizer(选择可视化平台) -
配置文件最重要的就是
metainfo参数和model参数,一定要检查分类数是否正确,以及调色板数量是否一致。注意:即使只有1类,metainfo也要写成'classes': ('cat', ),括号中的逗号一定要有,否则报错。model中的bbox_head也要和种类数一致。 -
学习率缩放一般遵循经验法则:
base_lr_default * (your_bs / default_bs)。从上面结构图中可以看到RTMDet模型有4个stages,model配置中dict(backbone=dict(frozen_stages=4), bbox_head=dict(num_classes=2))表示冻结了4个stages,即骨干网络全冻结。
config_animals = """
# Inherit and overwrite part of the config based on this config
_base_ = './rtmdet_l_8xb32-300e_coco.py'data_root = './data/' # dataset roottrain_batch_size_per_gpu = 24
train_num_workers = 4max_epochs = 50
stage2_num_epochs = 6
base_lr = 0.000375metainfo = {'classes': ('cat', 'dog', ),'palette': [(252, 215, 99), (153, 197, 252), ]
}train_dataloader = dict(batch_size=train_batch_size_per_gpu,num_workers=train_num_workers,dataset=dict(data_root=data_root,metainfo=metainfo,data_prefix=dict(img='images/'),ann_file='annotations/trainval.json'))val_dataloader = dict(batch_size=train_batch_size_per_gpu,num_workers=train_num_workers,dataset=dict(data_root=data_root,metainfo=metainfo,data_prefix=dict(img='images/'),ann_file='annotations/trainval.json'))test_dataloader = val_dataloaderval_evaluator = dict(ann_file=data_root + 'annotations/trainval.json')test_evaluator = val_evaluatormodel = dict(backbone=dict(frozen_stages=4), bbox_head=dict(num_classes=2))# learning rate
param_scheduler = [dict(type='LinearLR',start_factor=1.0e-5,by_epoch=False,begin=0,end=1000),dict(# use cosine lr from 10 to 20 epochtype='CosineAnnealingLR',eta_min=base_lr * 0.05,begin=max_epochs // 2,end=max_epochs,T_max=max_epochs // 2,by_epoch=True,convert_to_iter_based=True),
]train_pipeline_stage2 = [dict(type='LoadImageFromFile', backend_args=None),dict(type='LoadAnnotations', with_bbox=True),dict(type='RandomResize',scale=(640, 640),ratio_range=(0.1, 2.0),keep_ratio=True),dict(type='RandomCrop', crop_size=(640, 640)),dict(type='YOLOXHSVRandomAug'),dict(type='RandomFlip', prob=0.5),dict(type='Pad', size=(640, 640), pad_val=dict(img=(114, 114, 114))),dict(type='PackDetInputs')
]# optimizer
optim_wrapper = dict(_delete_=True,type='OptimWrapper',optimizer=dict(type='AdamW', lr=base_lr, weight_decay=0.05),paramwise_cfg=dict(norm_decay_mult=0, bias_decay_mult=0, bypass_duplicate=True))default_hooks = dict(checkpoint=dict(interval=5,max_keep_ckpts=2,  # only keep latest 2 checkpointssave_best='auto'),logger=dict(type='LoggerHook', interval=20))custom_hooks = [dict(type='PipelineSwitchHook',switch_epoch=max_epochs - stage2_num_epochs,switch_pipeline=train_pipeline_stage2)
]# load COCO pre-trained weight
load_from = './checkpoints/rtmdet_l_8xb32-300e_coco_20220719_112030-5a0be7c4.pth'train_cfg = dict(type='EpochBasedTrainLoop', max_epochs=max_epochs, val_begin=20, val_interval=1)
randomness = dict(seed=2023, deterministic=True, diff_rank_seed=False)
visualizer = dict(vis_backends=[dict(type='LocalVisBackend'), dict(type='WandbVisBackend')])
"""with open('./configs/rtmdet/rtmdet_l_1xb4-100e_animals.py', 'w') as f:f.write(config_animals)
模型训练
- 做好上面的工作以后就可以开始模型训练了
!python tools/train.py configs/rtmdet/rtmdet_l_1xb4-100e_animals.py
- 模型
epoch = 50时的精度
 Average Precision  (AP) @[ IoU=0.50:0.95 | area=   all | maxDets=100 ] = 0.952Average Precision  (AP) @[ IoU=0.50      | area=   all | maxDets=100 ] = 1.000Average Precision  (AP) @[ IoU=0.75      | area=   all | maxDets=100 ] = 0.995Average Precision  (AP) @[ IoU=0.50:0.95 | area= small | maxDets=100 ] = 0.800Average Precision  (AP) @[ IoU=0.50:0.95 | area=medium | maxDets=100 ] = 0.919Average Precision  (AP) @[ IoU=0.50:0.95 | area= large | maxDets=100 ] = 0.959Average Recall     (AR) @[ IoU=0.50:0.95 | area=   all | maxDets=  1 ] = 0.964Average Recall     (AR) @[ IoU=0.50:0.95 | area=   all | maxDets= 10 ] = 0.965Average Recall     (AR) @[ IoU=0.50:0.95 | area=   all | maxDets=100 ] = 0.965Average Recall     (AR) @[ IoU=0.50:0.95 | area= small | maxDets=100 ] = 0.800Average Recall     (AR) @[ IoU=0.50:0.95 | area=medium | maxDets=100 ] = 0.939Average Recall     (AR) @[ IoU=0.50:0.95 | area= large | maxDets=100 ] = 0.970
07/10 07:35:26 - mmengine - INFO - bbox_mAP_copypaste: 0.952 1.000 0.995 0.800 0.919 0.959
07/10 07:35:27 - mmengine - INFO - Epoch(val) [50][123/123]    coco/bbox_mAP: 0.9520  coco/bbox_mAP_50: 1.0000  coco/bbox_mAP_75: 0.9950  coco/bbox_mAP_s: 0.8000  coco/bbox_mAP_m: 0.9190  coco/bbox_mAP_l: 0.9590  data_time: 0.0532  time: 0.8068
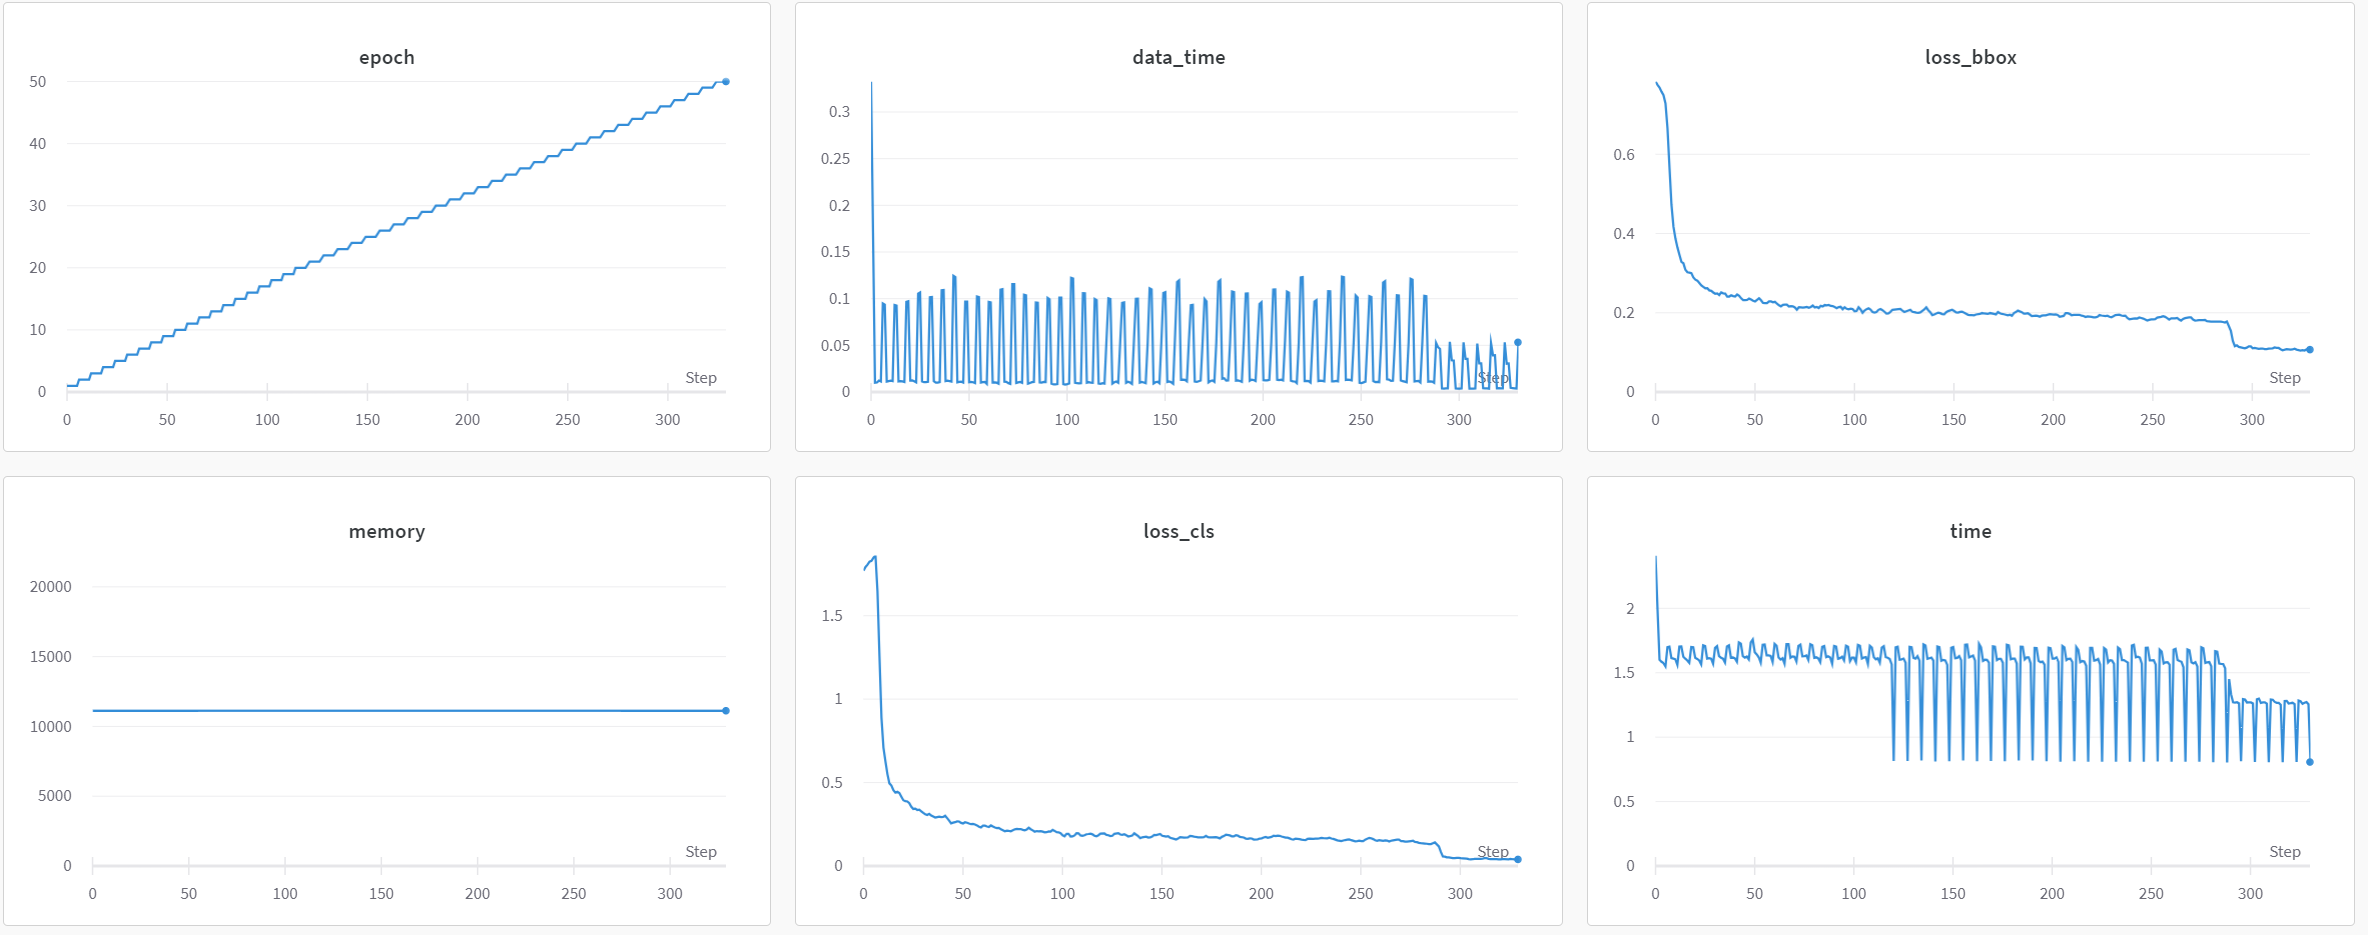
- 我们可以打开
wandb平台,跟踪训练精度,并将各项指标进行可视化
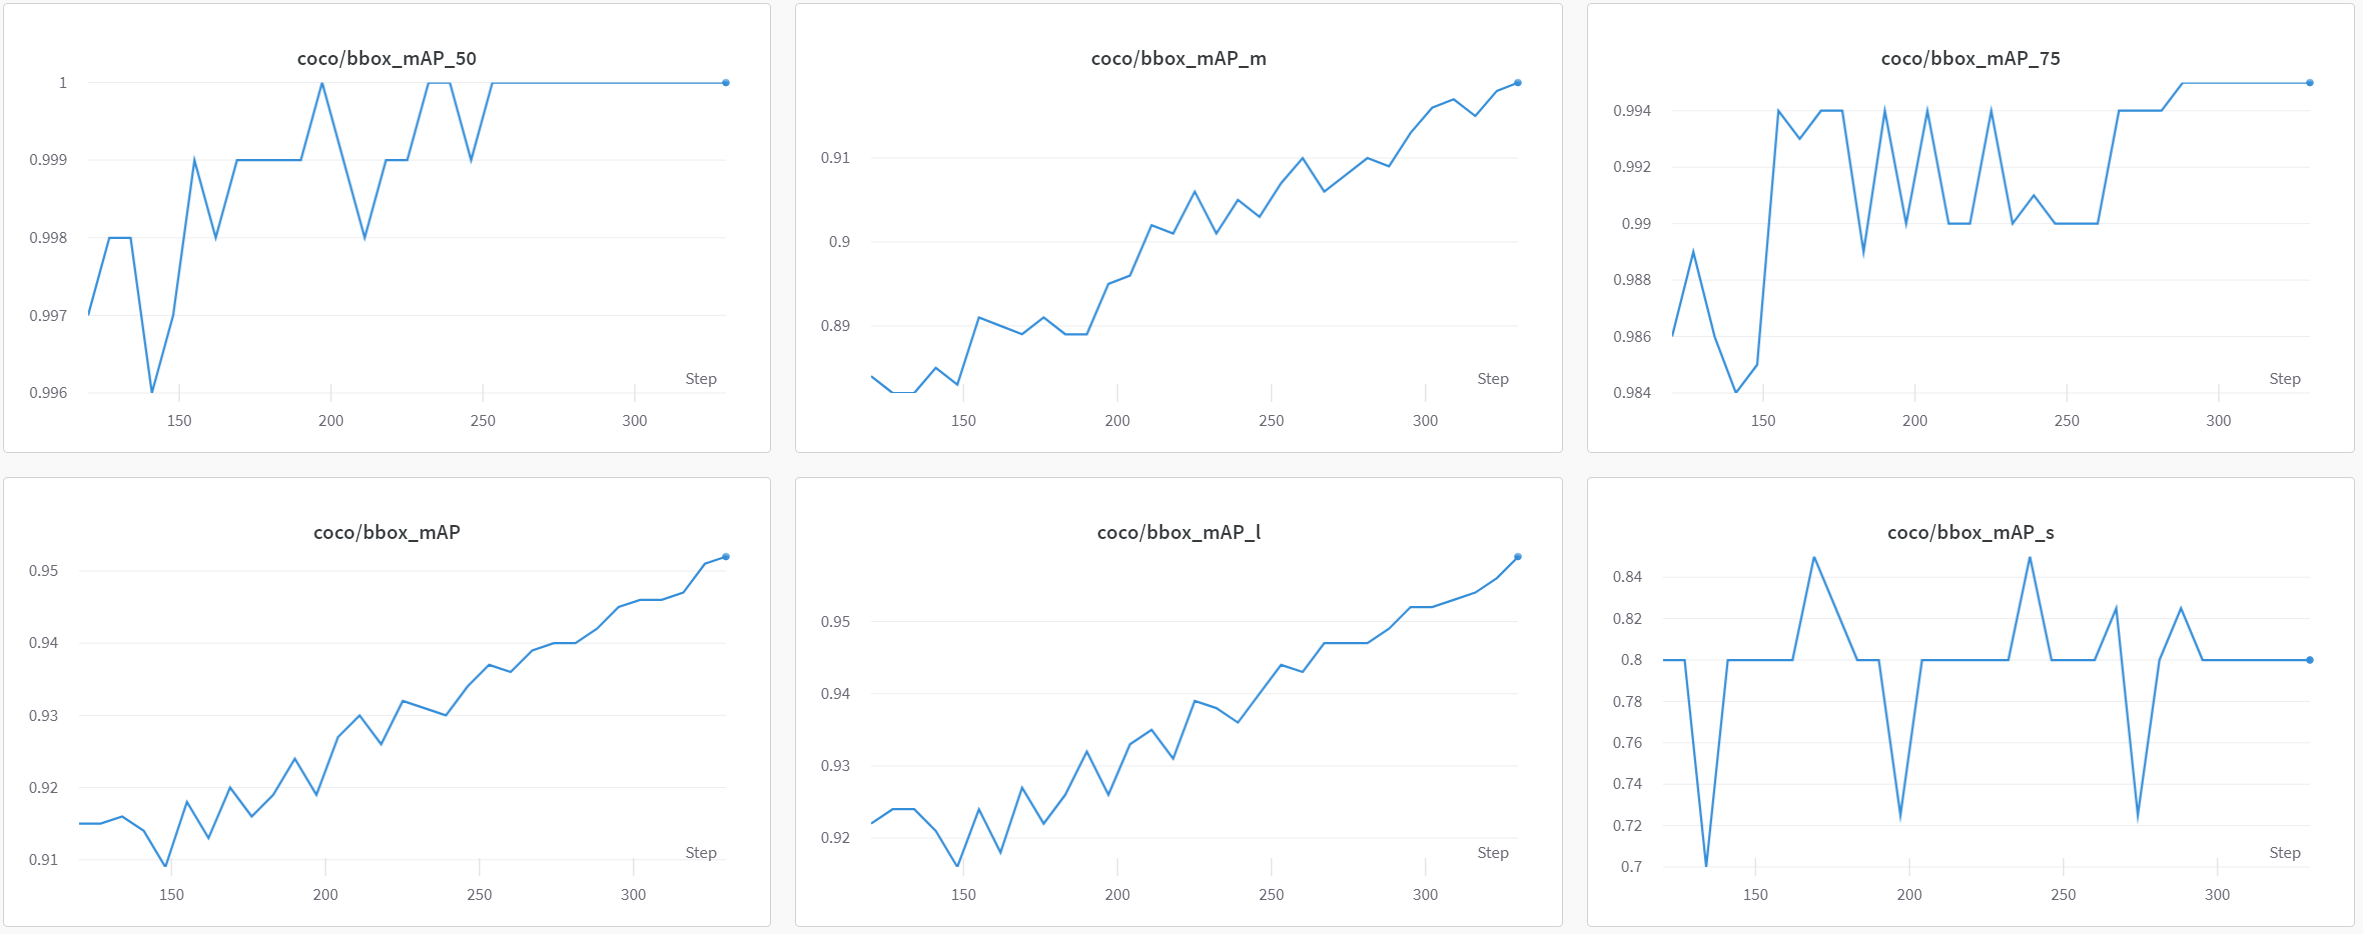
模型推理
- 当我们微调好模型后,可以在图片上进行推理
from mmdet.apis import DetInferencer
import globconfig = 'configs/rtmdet/rtmdet_l_1xb4-100e_animals.py'
checkpoint = glob.glob('./work_dirs/rtmdet_l_1xb4-100e_animals/best_coco*.pth')[0]device = 'cuda:0'inferencer = DetInferencer(config, checkpoint, device)img = './data/images/Cats_Test1011.png'
result = inferencer(img, out_dir='./output', pred_score_thr=0.6)display.clear_output()
Image.open('./output/vis/Cats_Test1011.png')
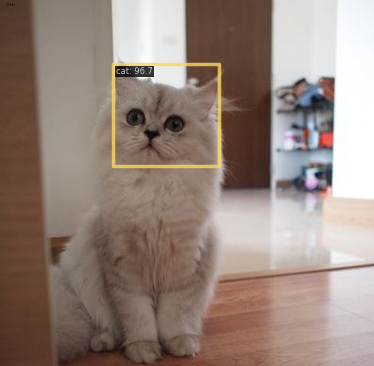
img = './data/images/Cats_Test1035.png'
result = inferencer(img, out_dir='./output', pred_score_thr=0.6)display.clear_output()
Image.open('./output/vis/Cats_Test1035.png')